Galentine's Red Velvet Cheesecake
Highlighted under: Baking & Desserts
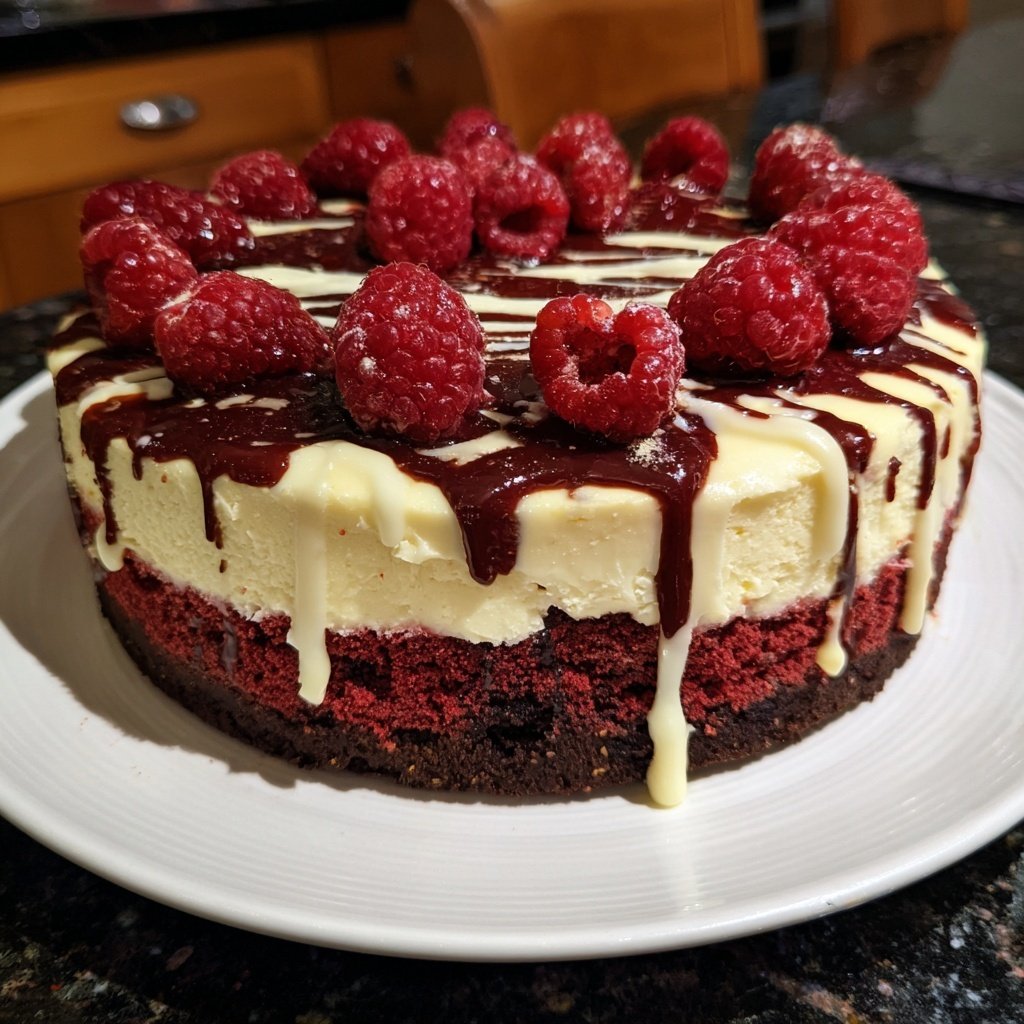
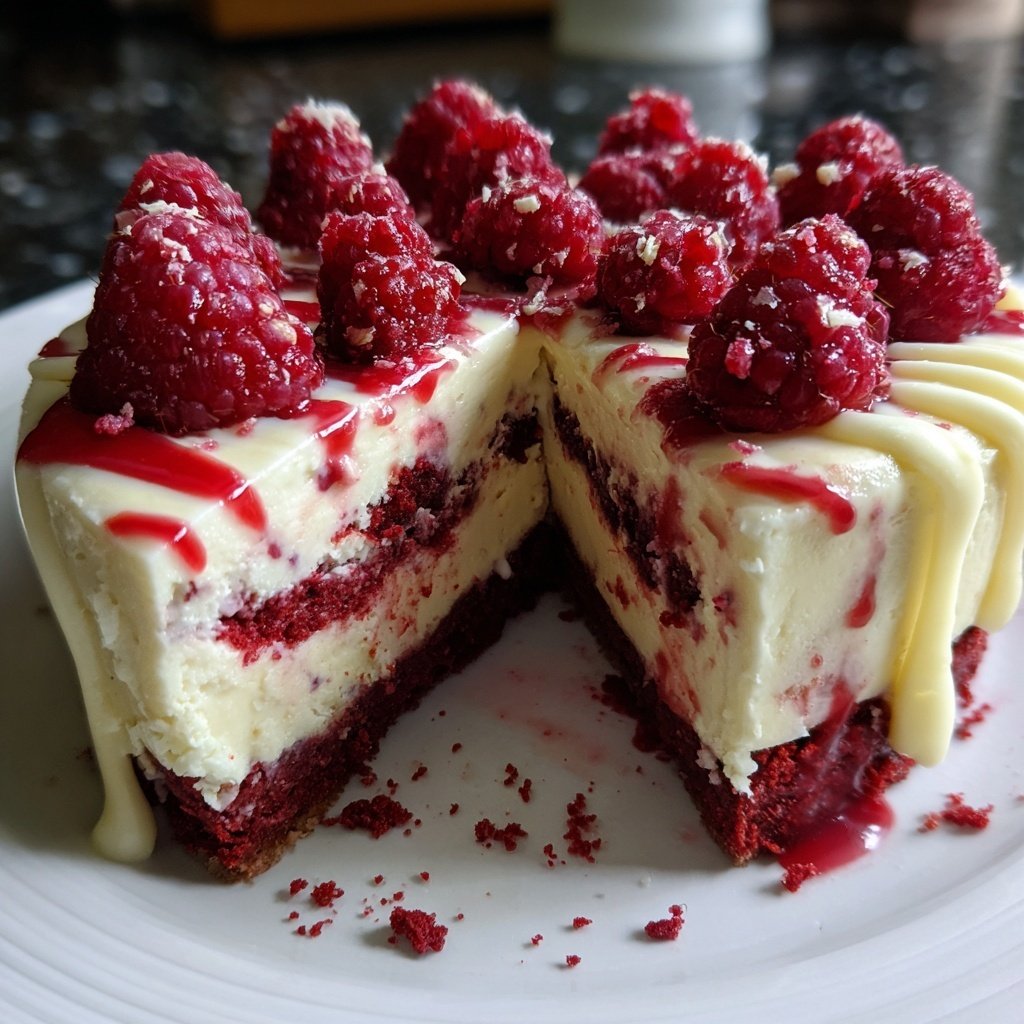
I absolutely love celebrating Galentine's Day with my closest friends, and this Galentine's Red Velvet Cheesecake is the perfect centerpiece for our gathering. It's a delightful combination of rich chocolatey red velvet cake and creamy cheesecake that never fails to impress. I find that the layering of the cheesecake with the red velvet adds a beautiful contrast, not only in color but in flavor. Whether it's for a fun brunch or a cozy night in, this dessert brings everyone together in the spirit of friendship.
When I first attempted making this cheesecake, I was pleasantly surprised by how the flavors complemented each other. The red velvet layer is not just for aesthetic appeal; the slight cocoa taste balances the tanginess of the cheesecake beautifully. I found that letting it chill overnight allows the flavors to meld perfectly, creating a more harmonious taste.
Another tip I discovered is to use a water bath while baking the cheesecake. It helps in maintaining moisture and prevents the surface from cracking, ensuring a smooth finish. This extra step is worth the effort!
Why You'll Love This Recipe
- A stunning showstopper perfect for any Galentine's celebration
- Decadent layers of cheesecake and red velvet cake
- Rich flavor that's balanced with a velvety texture
Understanding the Red Velvet Cake Base
The red velvet layer of this cheesecake is not only visually captivating but also crucial to the overall flavor profile. The combination of cocoa powder and red food coloring is what gives it that signature hue. If you prefer a deeper chocolate flavor, consider increasing the cocoa powder slightly, but be cautious not to disrupt the balance. Always sift your dry ingredients to avoid lumps, ensuring a smooth, uniform batter.
When mixing the wet and dry ingredients, it's important to do so gently to maintain the cake's tender texture. Overmixing can lead to a tougher crumb, which is the last thing you want in a delicate red velvet cake. Blend just until combined, and don’t worry if a few small streaks of flour remain; they’ll easily incorporate during baking.
Perfecting the Creamy Cheesecake Layer
For the cheesecake layer, using room temperature cream cheese is essential for a smooth texture. Cold cream cheese can lead to lumps, resulting in a less than ideal cheesecake. I recommend letting it sit out for at least 30 minutes before mixing. When beating the cream cheese and sugar together, aim for a glossy consistency; this indicates that the sugar is fully integrated and the mixture is airy.
Incorporating the eggs one at a time allows for better emulsification, which contributes to a silky texture. Take care not to overmix after adding the eggs, as this can introduce air bubbles that cause cracks in the cheesecake during baking. A gentle stir with a spatula can help combine the ingredients without incorporating excess air.
Baking and Storing for Success
Using a water bath is key for achieving a creamy cheesecake without cracks. The steam created from the hot water keeps the baking environment moist, which helps the cheesecake retain its smooth texture. Be sure to wrap the outside of the springform pan tightly in aluminum foil to prevent any water from seeping in, which could ruin your cheesecake.
Once baked, cooling the cheesecake slowly to room temperature before refrigerating is crucial. Rapid temperature changes can cause it to crack. After chilling for at least four hours, you can store leftovers in the fridge, where it will last for up to a week. If you want to make this dessert ahead of time, I recommend preparing it a day in advance, allowing the flavors to meld beautifully overnight.
Ingredients
Ingredients
For the Red Velvet Layer
- 1 ¾ cups all-purpose flour
- 1 cup granulated sugar
- 1 teaspoon baking soda
- ½ teaspoon salt
- 1 teaspoon cocoa powder
- 1 cup vegetable oil
- 1 cup buttermilk
- 2 large eggs
- 2 tablespoons red food coloring
- 1 teaspoon vanilla extract
- 1 teaspoon white vinegar
For the Cheesecake Layer
- 16 oz cream cheese, softened
- 1 cup granulated sugar
- 2 large eggs
- 1 teaspoon vanilla extract
- 1 tablespoon all-purpose flour
For Topping
- Whipped cream
- Chocolate shavings
Instructions
Instructions
Steps
Prepare the Oven and Pan
Preheat your oven to 350°F (175°C). Grease a 9-inch springform pan and wrap the outside with aluminum foil to prevent water from leaking in during the water bath.
Make the Red Velvet Cake Batter
In a large bowl, whisk together the flour, sugar, baking soda, salt, and cocoa powder. In another bowl, combine the oil, buttermilk, eggs, food coloring, vanilla extract, and vinegar. Mix the wet ingredients into the dry until combined.
Bake the Red Velvet Layer
Pour the batter into the prepared pan and bake for 20-25 minutes, or until a toothpick comes out clean. Allow it to cool in the pan.
Prepare the Cheesecake Filling
In a mixing bowl, beat the cream cheese and sugar together until smooth. Add eggs one at a time, mixing well after each. Stir in vanilla and flour until just combined.
Combine and Bake
Once the red velvet layer has cooled, pour the cheesecake batter evenly over the top. Set the springform pan inside a larger roasting pan and fill it with hot water halfway up the sides of the springform. Bake for 45-50 minutes.
Cool and Serve
Let the cheesecake cool to room temperature before refrigerating for at least 4 hours. Once chilled, top with whipped cream and chocolate shavings before slicing.
Pro Tips
- Make sure all ingredients are at room temperature for the best texture. You can also experiment by adding a layer of raspberry or strawberry jam between the layers for a fruity twist!
Serving Suggestions
This Galentine's Red Velvet Cheesecake is stunning when adorned with whipped cream and chocolate shavings, but there are countless ways to elevate its presentation. Consider serving it alongside fresh berries or a raspberry coulis for a bright, contrasting flavor that cuts through the richness. A drizzle of cream cheese frosting can also enhance its decadent profile, allowing guests to indulge fully.
For an extra layer of flavor, think about incorporating a fruit compote, like strawberry or cherry, right on top or on the side of each slice. This not only adds an element of freshness but also provides a beautiful visual contrast against the red velvet.
Dietary Modifications
If you're aiming for a gluten-free option, you can substitute all-purpose flour with a 1:1 gluten-free flour blend. This will require no adjustments in the recipe, as these blends are designed to mimic the properties of traditional flour. For a dairy-free version, consider using alternative cream cheeses made from nuts for the cheesecake layer, though the texture may vary slightly.
Replacing granulated sugar with an equivalent amount of a sugar substitute, like erythritol or coconut sugar, can also work for those avoiding refined sugars. However, be aware that it may impact the final flavor and texture, so testing can be beneficial.
Questions About Recipes
→ Can I use different food coloring?
Yes, but traditional red velvet uses red food coloring for its signature look.
→ How do I store leftovers?
Keep any leftovers in an airtight container in the refrigerator for up to 3 days.
→ Can I freeze this cheesecake?
Yes, wrap it tightly and freeze for up to 2 months. Thaw in the refrigerator before serving.
→ What's the best way to slice cheesecake?
Use a sharp knife dipped in hot water, wiping it clean between cuts for clean slices.
Galentine's Red Velvet Cheesecake
Created by: The Novarecipelab Team
Recipe Type: Baking & Desserts
Skill Level: Intermediate
Final Quantity: 8 servings
What You'll Need
For the Red Velvet Layer
- 1 ¾ cups all-purpose flour
- 1 cup granulated sugar
- 1 teaspoon baking soda
- ½ teaspoon salt
- 1 teaspoon cocoa powder
- 1 cup vegetable oil
- 1 cup buttermilk
- 2 large eggs
- 2 tablespoons red food coloring
- 1 teaspoon vanilla extract
- 1 teaspoon white vinegar
For the Cheesecake Layer
- 16 oz cream cheese, softened
- 1 cup granulated sugar
- 2 large eggs
- 1 teaspoon vanilla extract
- 1 tablespoon all-purpose flour
For Topping
- Whipped cream
- Chocolate shavings
How-To Steps
Preheat your oven to 350°F (175°C). Grease a 9-inch springform pan and wrap the outside with aluminum foil to prevent water from leaking in during the water bath.
In a large bowl, whisk together the flour, sugar, baking soda, salt, and cocoa powder. In another bowl, combine the oil, buttermilk, eggs, food coloring, vanilla extract, and vinegar. Mix the wet ingredients into the dry until combined.
Pour the batter into the prepared pan and bake for 20-25 minutes, or until a toothpick comes out clean. Allow it to cool in the pan.
In a mixing bowl, beat the cream cheese and sugar together until smooth. Add eggs one at a time, mixing well after each. Stir in vanilla and flour until just combined.
Once the red velvet layer has cooled, pour the cheesecake batter evenly over the top. Set the springform pan inside a larger roasting pan and fill it with hot water halfway up the sides of the springform. Bake for 45-50 minutes.
Let the cheesecake cool to room temperature before refrigerating for at least 4 hours. Once chilled, top with whipped cream and chocolate shavings before slicing.
Extra Tips
- Make sure all ingredients are at room temperature for the best texture. You can also experiment by adding a layer of raspberry or strawberry jam between the layers for a fruity twist!
Nutritional Breakdown (Per Serving)
- Calories: 420 kcal
- Total Fat: 30g
- Saturated Fat: 15g
- Cholesterol: 195mg
- Sodium: 150mg
- Total Carbohydrates: 35g
- Dietary Fiber: 2g
- Sugars: 25g
- Protein: 7g